In Skype for Business and, more recently, Teams deployments, a solid network and a good knowledge of it are fundamentally important.
We typically work very closely with the network/security departments and make sure to involve them from the beginning to have their support throughout the project. After deploying QoS, ideally before rolling out voice/video for the end-users, we run some tests to verify the QoS configuration, measure the reserved bandwidth and whether it remains stable over some amount of time. There are various tools available for this task, I mostly use iperf3 to generate traffic and measure basic parameters.
iperf3 basics
According to the GitHub page, iperf3 is “a tool for active measurements of the maximum achievable bandwidth on IP networks”. It is primarily developed on Linux but Windows executable are available from various sources. I’m using the version 3.6 build that can be found on NeoWin (see below).
After copying the files to the machine, we can start the server using the the following command line. This starts a listener at tcp/udp 5201 and waits for iperf clients to connect.
.\iperf3.exe -s
On the client side, we have multiple options, as stated above, iperf’s goal is to measure the maximum bandwidth, so if we start the client without parameters, that is what it will do:
 .\iperf3.exe -c 192.168.120.185
 Connecting to host 192.168.120.185, port 5201
[  5] local 192.168.120.160 port 52070 connected to 192.168.120.185 port 5201
[ ID] Interval           Transfer     Bitrate
[  5]   0.00-1.00   sec   530 MBytes  4.44 Gbits/sec
[  5]   1.00-2.00   sec   607 MBytes  5.09 Gbits/sec
...
Note that in the above example, iperf uses TCP and measures end-to-end available bandwidth between the client and server. This may saturate network links in between. Use with caution.
We can also try to simulate RTP media (small UDP packets) by specifying the following parameters:
.\iperf3.exe -c 192.168.120.185 -u -b 200k -l 200
Note that with UDP, the target bitrate defaults to 1 Mbit per second, this can be changed with the -b parameter. Also, when using UDP, jitter and packet loss are measured.
More information: NeoWin, GitHub, Documentation (outdated)
Now that we have a tool to generate traffic and measure bandwidth, we can go ahead and put some DSCP tags on the traffic to see how the network handles quality of service.
iperf has a –dscp parameter, this does not work on Windows as applications are not trusted to set DSCP values. The only way (that I know of) to tag packets with DSCP values is policy-based QoS.
Creating the QoS Policies
We would typically use group policies to manage policy-based QoS settings but since this is a test, we can go ahead and use the NetQos PowerShell module on the client/server machines to create temporary policies.
A quick Get-Command -Module NetQos shows that the module provides four cmdlets, we can Get, Set, Remove, and create New QoS policies with the respective *NetQosPolicy cmdlet.
So we create two policies for the iperf server and client applications. The server listens on port 5201 by default, so all traffic originating from the server will use that source port.
New-NetQosPolicy -Name "iperf_server" -NetworkProfile All -AppPathNameMatchCondition iperf3.exe -IPSrcPort 5201 -DSCPValue 46 -PolicyStore ActiveStore
The client will communicate with the server by sending to the port 5201, so all traffic originating from the client will use that destination port.
New-NetQosPolicy -Name "iperf_client" -NetworkProfile All -AppPathNameMatchCondition iperf3.exe -IPDstPort 5201 -DSCPValue 46 -PolicyStore ActiveStore
Note: By specifying ActiveStore as the policy store, the QoS policy will not be persistent. On the next reboot of the system, it will be gone.
We want to measure both directions, so we create both policies on the server and both on the client.
Test and trace
Now it’s time to start a network trace on the client and the server and run iperf again. If QoS has been configured, we should see packets leaving the client tagged with DSCP 46 and this tag should be preserved and be displayed on the server-side as well. I run the following two tests on the client, the -R parameter reverses the flow, so in the second case, the server sends packets to the client:
 .\iperf3.exe -c 192.168.120.185 -u -b 200k -l 200 -J --logfile send.json
 .\iperf3.exe -c 192.168.120.185 -u -b 200k -l 200 -R -J --logfile recv.json
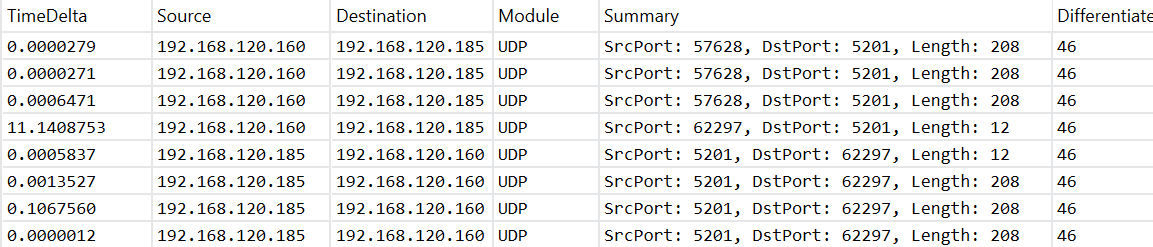
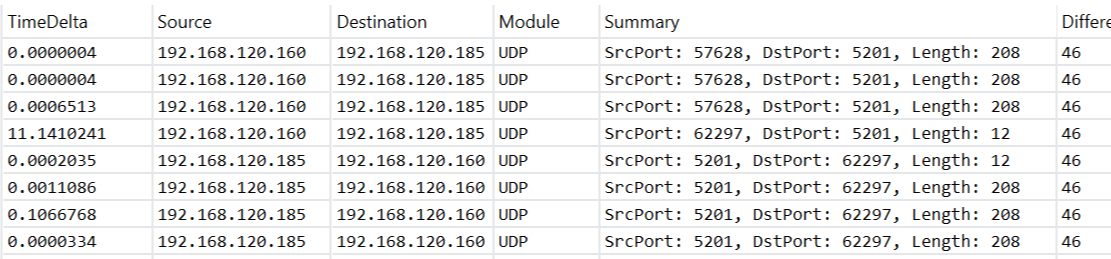
The following screenshots show a trace from the above test on the client (1) and on the server (2). We can see that packets from client to the server (source: 192.168.120.160, destination: 192.168.120.185) are tagged on the client…
… and the tag is still present when the server receives them.
After switching the stream’s direction (with -R), we observe the same: packets leave the server tagged, and are received by the client with the tag still on.
With the -J and --logfile parameters we instruct iperf to write output in JSON format and redirect it to a text file. With PowerShell we can now easily work with that data:
$send = Get-Content send.json -Raw | ConvertFrom-Json
$send.intervals.streams | Out-GridView
$send.end.sum
At this point, it’s important to note that until now we have only proved, that the network does not remove the DSCP tags we put on our test packets. Whether the network actually prioritizes such packets is not yet clear. The easy way to verify that, would be to log into the network devices (QoS policies are typically enforced on routers) and get some counters/statistics. If that is not possible, we have to find out how much bandwidth is reserved for a given class empirically. To do that, we need a link that can be saturated (no congestion, no prioritization) and then run the above test again.
More about QoS Policies
When configuring policy-based QoS, either by group policy or by PowerShell, check the event log to see if the system refreshed the policy correctly. The following event is logged, when a policy change is detected:
Log Name:      Microsoft-Windows-Policy/Operational
Source:        Microsoft-Windows-EQoS
Event ID:      2
Level:         Information
Description:   Computer QoS policies successfully refreshed. Policy changes detected.
The NetQos module is a wrapper for the WMI/CIM objects managing the quality of service policies. We can also manipulate the CIM instance directly, e.g. to delete policies:
Get-CimInstance -Namespace ROOT/StandardCimv2 -ClassName MSFT_NetQosPolicySettingData | Remove-CimInstance
Links: