The current state of email
The year is 2021 and, despite many efforts to kill it off, email is still going strong. According to Microsoft’s latest digital defense report Exchange Online Protection processed 6 trillion messages last year, 13 billion of which malicious. 6 trillion, that’s a number with 12 zeros. And that’s just Exchange Online. Worldwide we are sending and receiving over 300 billion emails every day, according to this site. 300 billion. Every day.
With these numbers there’s no wonder email is one of the main threat vectors.
As many organizations are moving their mailboxes to Exchange Online, I thought I would share my basic setup for new tenants. This will help you getting started with a secure configuration in no time. I have two goals with this basic setup:
- Protect your brand (domain) from being spoofed/abused
- Protect your users from receiving malicious emails
Sender Authentication
So you have just signed up for a new tenant with Microsoft 365 and you are adding your custom domains. The wizard will ask you, whether or not you are planning to use Exchange Online and, if you select yes, it will help you setup SPF.
Sender policy framework
Even though it has only been published as proposed standard by the IETF in 2014, SPF has been around since the early 2000’s. Despite it’s age it is still something we regularly find missing or misconfigured in customer environments. SPF gives an administrator of an email domain a way to specify which systems (IP addresses) are allowed to send emails using the domain. The admin publishes a TXT record in the DNS, listing all IP addresses that are allowed to send emails. This would typically be your onprem Exchange servers or email gateways.
Receiving systems check the TXT record and see if the system that’s trying to deliver a message is allowed to do so.
If you want to start sending emails from Exchange Online, you should add the following line to your existing SPF record.
include: include:spf.protection.outlook.com
If you don’t have an SPF record in place, create a new TXT record at the root of your domain with this content:
v=spf include:spf.protection.outlook.com -all
If you are not using a domain for outbound email, please publish the following SPF record to make it harder for criminals to abuse your domain:
TXT:
v=spf -all
This is how far the wizard goes but we should really always configure the following records as well.
DomainKeys Identified Mail
DKIM has been standardized in 2011 and, in parts thanks to Exchange Online, is being used widely. However, we find SPF is better known and understood by our customers. DKIM leverages digital signatures that let a receiving system cryptographically verify whether an email was sent by an authorized system or not. The signature includes a domain name (d=) that should match the domain in the mail from address. Like SPF, DKIM uses DNS records in the sender’s email domain. The administrator of the domain publishes a TXT record that contains a public key and then configures the email server to sign all outgoing messages with the corresponding private key.
Receiving systems see the signature and a so called selector in the header of the email. The selector tells the receiving system where to find the public key to verify the signature. As always with certificates, keys have to be rotated periodically which means DKIM DNS records must be updated accordingly. Sounds like a lot of complicated work, right?
With Exchange Online, Microsoft does that work for you. All outgoing emails from Exchange Online are signed with a key that Microsoft manages. The only thing we have to do, is point our DNS to that key and enable the configuration. There is a lengthy docs article about DKIM and how to build the DNS records you have to publish. I am using a few lines of PowerShell to make that process easier.
Use the following PowerShell snippet to:
- Create a new DKIM signing configuration for your custom domain
- Publish DNS records pointing to Microsoft domains
- Enable the DKIM signing configuration
# Create DKIM signing config for all domains that do not have one
$d = Get-DkimSigningConfig
$domains = $d.domain
Get-AcceptedDomain | % {
if ($_.DomainName -in $domains) {}
else { New-DkimSigningConfig -KeySize 2048 -DomainName $_.DomainName -Enabled $false}
}
# Create DNS Records
Get-DkimSigningConfig | Where-Object Name -NotMatch onmicrosoft | Select-Object Name,*cname*,@{
n="Selector1";
e={($_.Selector1CNAME -split "-" | Select-Object -First 1),$_.name -join "._domainkey."}},@{
n="Selector2";
e={($_.Selector2CNAME -split "-" | Select-Object -First 1),$_.name -join "._domainkey."}
}
Once the DNS records are in place, we can go ahead and enable the DKIM configuration:
Get-DkimSigningConfig | Set-DkimSigningConfig -Enabled $true
If you are not using a domain for outbound email, you don’t have to worry about DKIM.
Domain-based Message Authentication, Reporting and Conformance
DMARC is the new kid on the bloc. Well kind of, the RFC is from 2015. It is yet another DNS record that an administrator can use to tell receiving systems what exactly they should do with emails that fail SPF or DKIM. Essentially DMARC builds on SPF and DKIM and uses both to calculate an authentication result that supports scenarios where SPF alone would fail (forwarding). The DMARC policy is also used to define what should happen with unaligned or failing DKIM signatures as DKIM itself doesn’t really specify that.
So, another DNS record you said? Here we go:
Name: _dmarc.example.com
Type: TXT
Value: v=DMARC1; p=none; pct=100;
While the SPF record must be published at the root of your domain, the DMARC record must be at _dmarc.
With DMARC it is recommended to implement monitoring, so we will have to look at an additional tool. I have found the DMARC Monitor from ValiMail is a good option to get started, it is also free for Microsoft 365 customers. There are many alternatives, please check with your security team if you already have a tool. Whichever tool you end up using, it will ask you to update your DMARC record to include an URI of a mailbox to send reports to. The rua and ruf tags in the TXT record are used for that, in the case of ValiMail the complete record looks like this:
v=DMARC1; p=none; pct=100; rua=mailto:[email protected];
This record tells a receiving system to deliver emails independent of the authentication result (p is set to none) and send aggregated reports (rua) to ValiMail.
With this record in place, you are now ready to send emails from Exchange Online. But we’re not completely done with DMARC just yet.
The ultimate goal is to set the DMARC policy to p=reject thereby telling any receiving system to reject emails that fail authentication. Before we can do that, we must make sure all legitimate emails pass authentication. The monitoring helps us verify exactly that, the example in the following screenshot shows outbound emails from our systems for the last month. As you can see, all of them authenticated successfully:
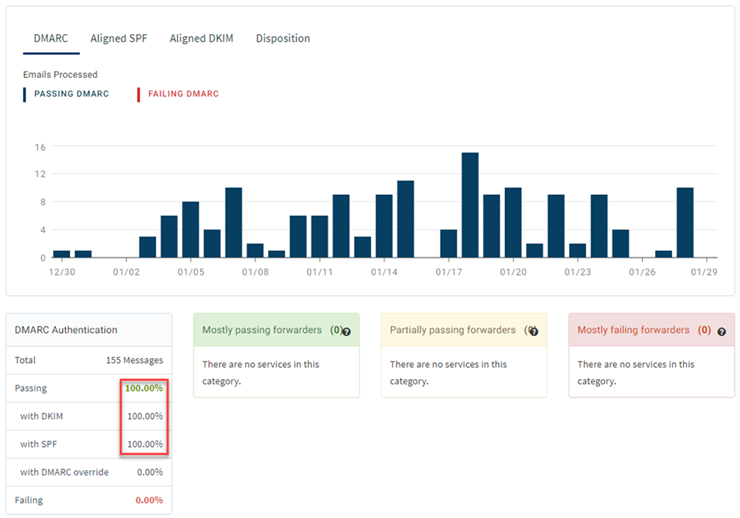
Exchange Online does currently not send DMARC reports, so if you are sending only to Exchange Online recipients, don’t expect much information in your monitoring.
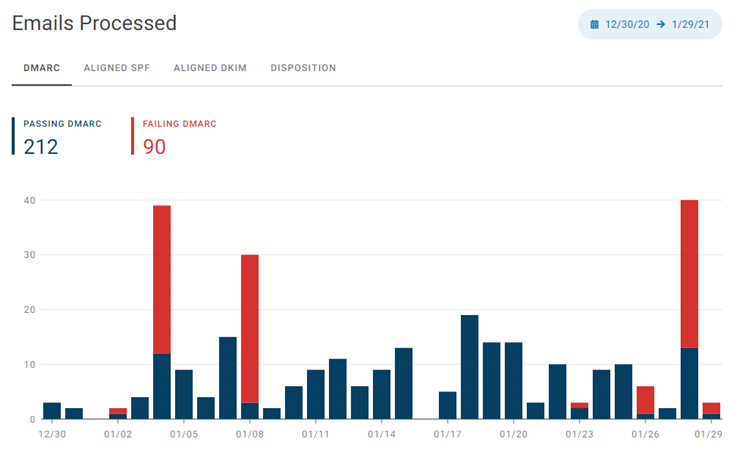
Remember that I said from our systems above, now let’s change that filter in ValiMail and look at all emails from our domain. As you can see in the screenshot below, over the same period of time, 90 emails failed DMARC authentication:
In our case, we already have a reject policy in place, so receiving systems should not accept these emails which are spam or worse. So, after setting up DMARC monitoring with a policy of none, observe the situation for some time and, if you are confident your systems are configured correctly, go ahead and update the record:
v=DMARC1; p=reject; pct=100; rua=mailto:[email protected];
If you are not using a domain for outbound email, please publish the following DMARC record to make it harder for criminals to abuse your domain:
TXT: v=DMARC1; p=reject; pct=100;
In the next post we will have a look at preset security policies in Exchange Online Protection.
— Tom.