Using Invoke-RestMethod to send events to a Splunk instance.
Splunk
If you don’t know Splunk this article is not going to give a thorough introduction. Let’s just say it’s a pretty fancy log collector/analytics tool. According to the company’s profile, Splunk turns machine data into answers. The goal of this article is to demonstrate how to use PowerShell to send events to the HTTP Event Collector which is Splunk’s REST interface to ingest logs.
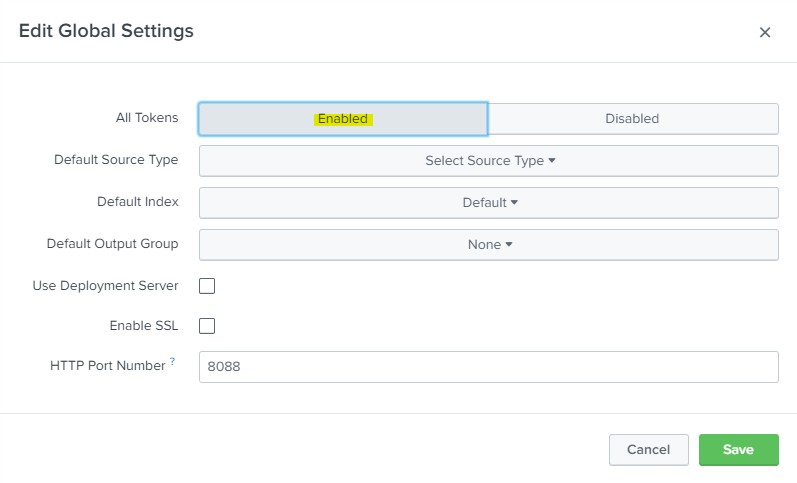
Enable Event Collector and create API Key (Token)
Connect to your Splunk’s web interface with appropriate permissions and using Settings, Data inputs, click on HTTP Event Collector. If you are not already using the Event Collector service it has to be enabled using the Global Settings button in the top right corner.
Then use the New Token button to create a new API key and configure how Splunk handles data it receives using this token. In the first step, give a name to the token you are about to create.
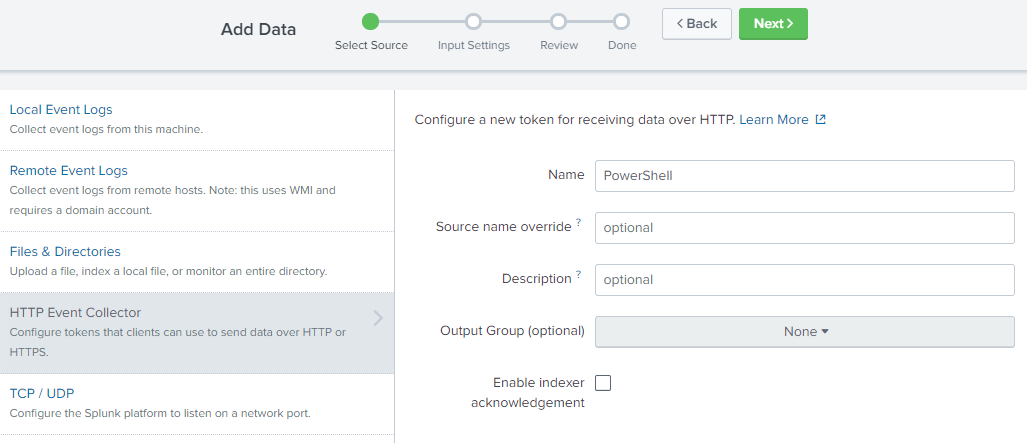
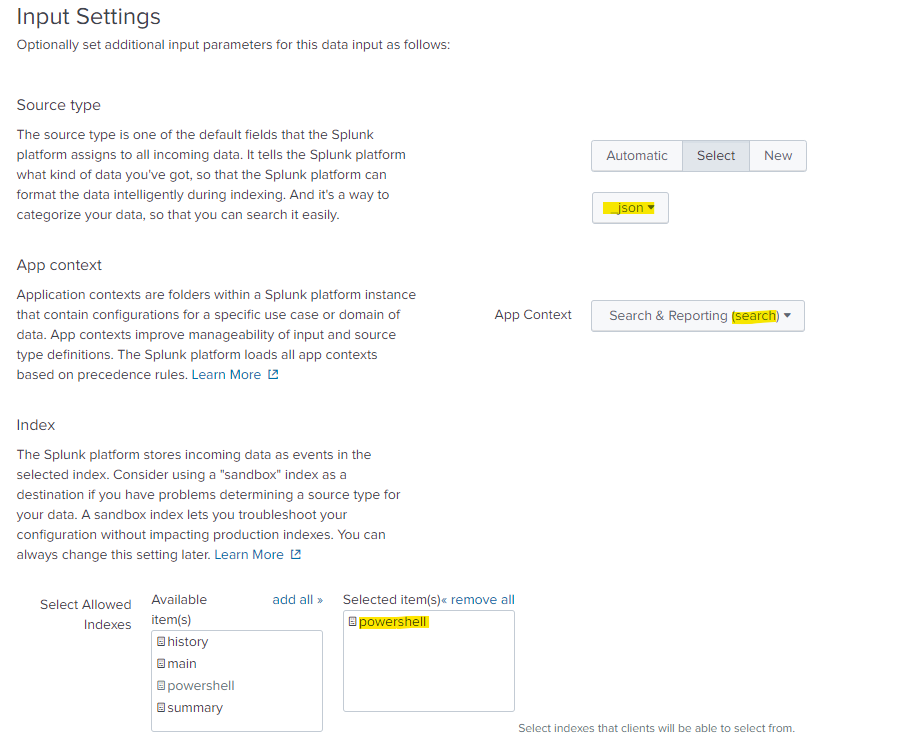
The second step is about handling the data, select an appropriate source type, I use json in this case, and the the right App Context. I select the search app for this example, though it can be any installed Splunk app. At the bottom of step two, select the index where Splunk will store the data. If you are not sure which index to use, create a new one. I created an index with the name of PowerShell and assigned it to the search application as selected before.
Review the configuration in the last step and create the new token. Take note of the Token Value, you will need it later.
Once the token has been created, you can click on Start Searching and Splunk will automatically create the right search for you. As we have not yet sent data, the search should not return any results.
PowerShell Send-SplunkEvent
I put together a quick wrapper for Invoke-RestMethod that makes sending logs to Splunk relatively easy. All you need is the API key (Token Value) from above and the URI of your event collector service. For this example I am using a Splunk instance on my local machine, so the Uri is “http://localhost:8088/services/collector”, for a production environment, you would probably use https and replace localhost with the name of your instance.
The idea behind the script was to sort through logs from different systems in PowerShell, turn them into structured data and send them to Splunk. As logs originate on systems other than the one where this script runs, the HostName parameter can be used to specify the ‘host’ property of the event and the DateTime parameter can be used to set the ‘time’ property.
Examples and usage
The script has two required parameters, InputObject and Key. Use the InputObject parameter to pass an object (or hashtable) to the script. This will be turned into json, using PowerShell’s ConvertTo-Json and then sent to the REST API using Invoke-RestMethod.
Use the Key parameter to pass the HTTP Event Collector token that we created above to the script.
.\Send-SplunkEvent.ps1 -InputObject @{message="Hello Splunk!";severity="INFO"} -Key <token>
Get-Service wuauserv | .\Send-SplunkEvent.ps1 -Key <token> -Uri http://localhost:8088/services/collector
The first example just sends a custom hashtable with the two fields message and severity. The second example gets a service object and converts it into a json object before sending it.
Note: The Uri parameter defaults to localhost, you will have to specify it like in the second example, if sending to a remote instance.
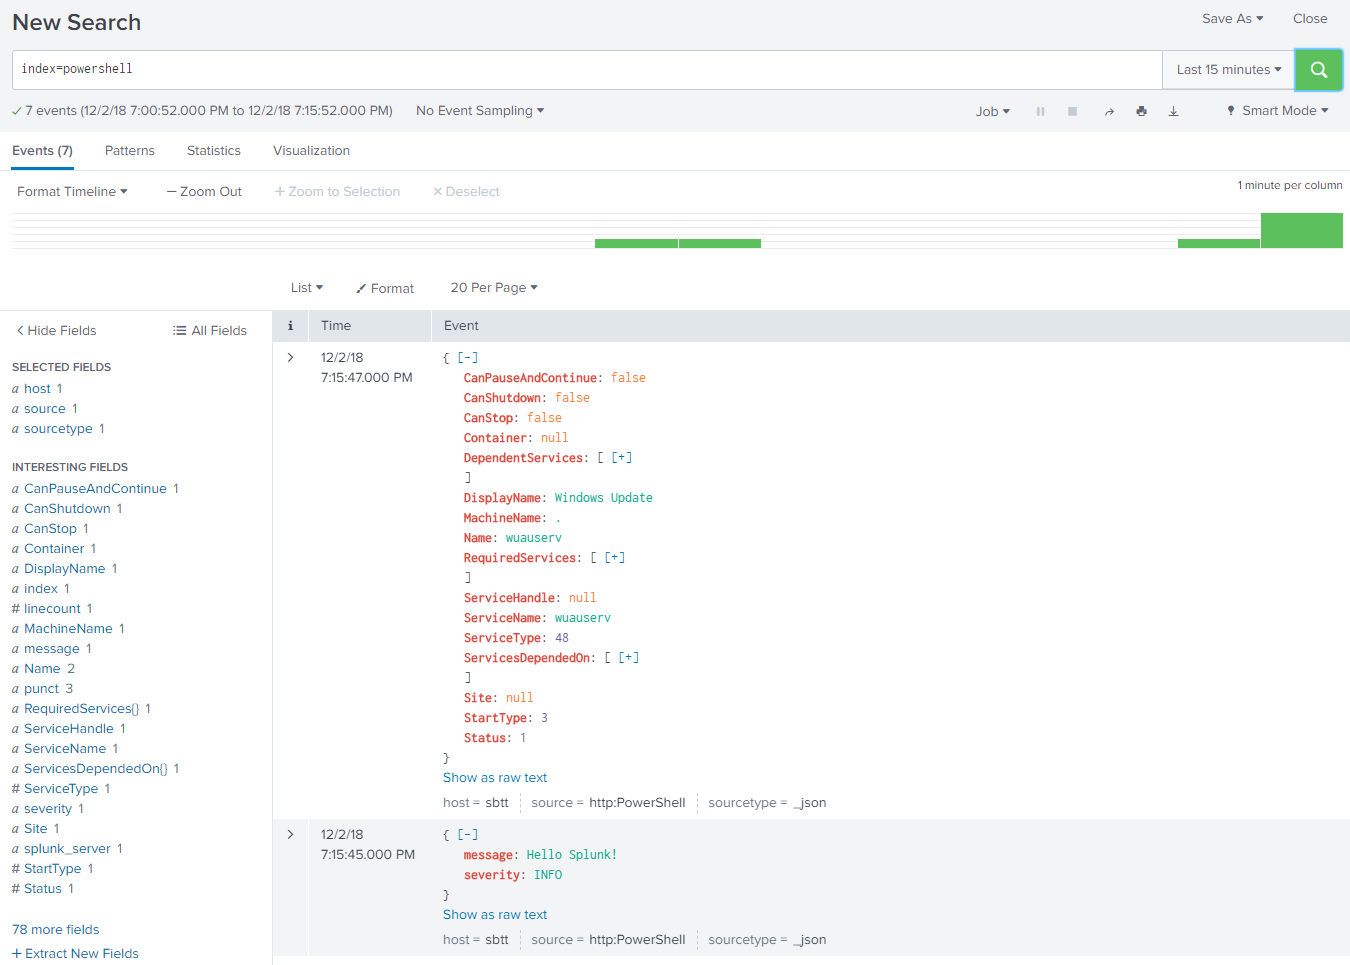
Search
Now search for the events in the newly created PowerShell index: index="powershell" sourcetype=_json
Performance
As the script is making a new RESTful call for every single event, this is not the fastest way to get logs into Splunk. I have made some tests to compare WindowsPowerSell with the Core edition, here is what I’ve found:
Measure-Command { Get-Process | .\Send-SplunkEvent.ps1 -Key <token> }
The above command takes 30 seconds on WindowsPowerShell, while it takes about 280 seconds on Core (tested with 6.1.0 and 6.2.0 preview 2).
Download & Source for
The Script is available on the PowerShell Gallery, you can install or download it using the following commands:
Install- -Name -Scope CurrentUserSave- -Name -Path <Path>And you can find the source on GitHub: tomtorggler
Links: