Welcome back to the second part of our little fun experiment with Telegram and Azure Functions. In the first part we created the function app and the bot, now let’s hook them up.
Connecting the bot with the Azure Function
We can get updates from Telegram bots in two ways, there is a getUpdate method that can be polled periodically, or we can use Webhooks. Our HTTP trigger function in Azure will run whenever it receives a http request, so it is just perfect for the latter.
To configure our Azure Function as a destination for the bot’s webhook, we use the setWebhook method and pass a hashtable with an URL parameter:
Invoke-RestMethod -Uri https://api.telegram.org/bot528059907:AAxxVs/setWebhook -Body @{
    "url"="https://ntsystemsbot.azurewebsites.net/api/Listener?code=WaaxxyA=="
} -Method Post
To verify that the URL has been set correctly, we can call getWebhookInfo:
[PS] C:\> Invoke-RestMethod https://api.telegram.org/bot528059907:AAxxVs/getWebhookInfo

  ok result
  -- ------
True @{url=https://ntsystemsbot.azurewebsites.net/api/Listener?code=Waa...
At this point our function will get a http request every time someone writes to the Bot account. So now it’s time to do something with it.
Overview
First of all: I am sure there are a hundred ways this can be done better… What I am trying to accomplish with this simple example is a demonstration of Azure Functions and the different triggers, inputs, and outputs it provides. That said, here’s what I came up with:
Our first function, the Listener, uses a HTTP trigger as input and Azure Queue Storage as output. This function will run, whenever a user sends a message to our bot and it will take the message and write it to a Storage Queue.
Another function, I called it UpdateData uses a timer trigger to get information from the blog and write it to Azure Blob Storage.
The third function, our Worker, uses Azure Queue Storage as trigger and Azure Blob Storage as input. The trigger is the same Queue that the Listener writes to, so a request coming from Telegram will be written to a Queue by the Listener function and trigger this Worker function.
A last function, the Responder, finally sends a POST request to the Telegram bot. This function is triggered by the Worker’s output queue and uses no other inputs or outputs.
To summarize, the Storage Queues are connected like this:
- Listener > Worker > Responder
The Functions
There are different ways to create or modify functions. The Azure console provides an easy-to-use GUI to configure triggers, inputs and outputs. It even has an editor for the functions’s code :) For the more advanced stuff, we can connect to the functions Kudu Services and upload files directly or use the debug consoles. Each function basically consists of a folder, the folder contains a function.json file which describes the function (type, trigger, input, output) and a run.ps1 file which contains the PowerShell code.
The Listener
As mentioned before, the first function just listens for a http request by the Telegram Bot and writes it to a storage queue.
The function.json file defines the trigger httpTrigger and the input/output variables. The following is the actual configuration file for my Listener function:
{
  "bindings": [
    {
      "name": "req",
      "type": "httpTrigger",
      "direction": "in",
      "webHookType": "genericJson"
    },
    {
      "name": "res",
      "type": "http",
      "direction": "out"
    },
    {
      "type": "queue",
      "name": "outputQueueItem",
      "queueName": "listenerqueue",
      "connection": "AzureWebJobsDashboard",
      "direction": "out"
    }
  ],
  "disabled": false
}
The name defined in each object is made available as variable in the function’s code and contains a file path. That allows us to use Get-Content $req to get the HTTP request’s body. As well as Out-File $outputQueueItem and Out-File $res to write to the Storage Queue or respond to the HTTP request, respectively. How cool is that?!
The functions code, in the run.ps1 file is as simple as that:
# POST method: $req
$requestBody = Get-Content $req -Raw

# Wirte input to Queue
Out-File -FilePath $outputQueueItem -Encoding Ascii -inputObject $requestBody

# Respond to the incoming web request
Out-File -Encoding Ascii -FilePath $res -inputObject $true
The request body is made available through the $req variable, we read the variable and write it to the $outputQueueItem which represents the Storage Queue listenerqueue\outputQueueItem in the AzureWebJobsDashboard storage account.
We do also respond to the incoming web request by writing to the $res variable.
The Worker
The next function is triggered by the same listenerqueue\outputQueueItem we write to in the first function, so it will always run, after the first function finished. The content of the storage queue is made available through the $triggerInput variable:
{
  "bindings": [
    {
      "name": "triggerInput",
      "type": "queueTrigger",
      "direction": "in",
      "queueName": "listenerqueue",
      "connection": "AzureWebJobsDashboard"
    },
    {
      "type": "blob",
      "name": "inPosts",
      "path": "outcontainer/posts",
      "connection": "AzureWebJobsStorage",
      "direction": "in"
    },
    {
      "type": "queue",
      "name": "outputQueueItem",
      "queueName": "workerqueue",
      "connection": "AzureWebJobsDashboard",
      "direction": "out"
    }
  ],
  "disabled": false
}
This function does not send HTTP responses, so there is no need to define an HTTP output. The only output for the Worker is another storage queue.
As you’ve noted, we define another input for this function, namely outcontainer/posts, we’ll get to that later.
The PowerShell code in run.ps1 does the actual work, so it evaluates the input and decides what to do with it.
# Read input from StorageQueue
$requestBody = Get-Content $triggerInput -Raw | ConvertFrom-Json
$posts = Get-Content $inPosts -Raw | ConvertFrom-Json | Select-Object -Expand items
...
Out-File -Encoding Ascii -FilePath $outputQueueItem -inputObject ($outObj | ConvertTo-Json)
Again, we simply read the input using Get-Content and write the output to the defined variable. I’ve omitted the actual code, to make this readable. You can find the code here:
ntsystemsit/ntsystemsbot
The Responder
The responder is finally triggered by the workerqueue\outputQueueItem and sends an http request to the Telegram Bot API, thereby responding to the user. The configuration is basically the same as above, and you can find it in the GitHub repo.
To actually send a message to the Telegram Bot, I’ve created the following helper function. It uses Invoke-RestMethod to send a POST request to the /sendMessage API endpoint.
function New-TelegramMessage {
    [cmdletbinding()]
    param(
        $ChatId,
        $Text,
        $Mode = "Markdown",
        $ReplyId,
        $ReplyMarkup
    )
    $body = @{
        "parse_mode" = $mode;
        "chat_id"= $ChatId;
        "text" = $Text;
    }
    if($ReplyId) {
        $body.Add("reply_to_message_id",$ReplyId)
    }
    if($ReplyMarkup) {
        $body.Add("reply_markup",(ConvertTo-Json $ReplyMarkup -Depth 5))
    }
    Invoke-RestMethod -Uri https://api.telegram.org/bot$env:TG_Token/sendMessage -Body $body -Method Post
}
Note: The URL must contain the Bot’s API key. As I wanted to publish the code, I’ve stored the key in the function’s application settings. These settings are available as environment variables in the code, so I can access the key thorough:
$env:TG_Token.
Update Data
The last piece we need for our little example is the UpdateData function. This one uses a timer trigger and just gets all posts of our blog and stores them in an Azure Storage Blob.
The function definition contains the schedule and the Storage Blob we want to write to:
{
  "bindings": [
    {
      "name": "myTimer",
      "type": "timerTrigger",
      "direction": "in",
      "schedule": "0 0 1 * * *"
    },
    {
      "type": "blob",
      "name": "outPosts",
      "path": "outcontainer/posts",
      "connection": "AzureWebJobsStorage",
      "direction": "out"
    }
  ],
  "disabled": false
}
The schedule is in a cron-type format, so this function will run at 01:00 hours every day.
Again, the PowerShell code is simple enough:
(Invoke-WebRequest https://ntsystems.it/api/v1/posts/ -UseBasicParsing).content | Out-File -Encoding ascii -FilePath $outPosts
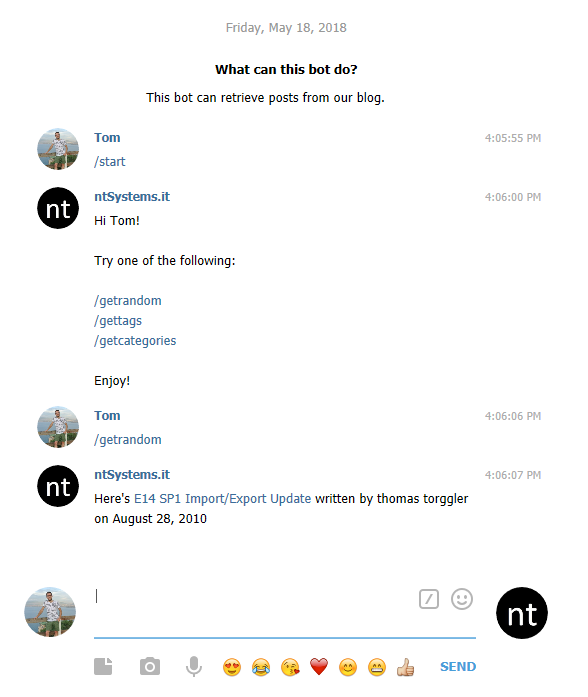
The Bot in action
Ok, so with all of our code in place, we should now be able to communicate with our Bot using the Telegram messenger. Just search for the ntsystemsbot account and try it out :)
This turned out to be a long story and there is so much left to explore. I hope the first two posts of this little series helped you understand the basics of Azure Functions, if someone finds a more practical use case a PowerShell-based Chatbot, I’d like to hear about it :)
Thanks for reading!
Tom