Hello everybody, after thinking about installation, client access and mail routing, we are getting ready to move some mailboxes.
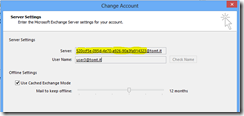
So, we talked about Exchange 2013 CAS being a pretty smart proxy, that’s why we had to append ?ExchClientVer=15 to the ECP URL in order to get to the new Admin Center while the Mailbox was still on Exchange 2010. Obviously, once the mailbox gets moved to Exchange 2013 this is no longer required. Another thing that will change as we move mailboxes from Exchange 2010 to 2013 is the Outlook Profile, it does no longer show the RPCClientAccess endpoint as Server, instead it gets updated to show the <Mailbox GIUD>@<Primary SMTP domain>.
Moving mailboxes
There are a couple of things to take into consideration before moving mailboxes to the 2013 server. As we learned in part two of this series, it is essential to move the namespaces used by Exchange to the new CAS prior to moving mailboxes, users would not be able to access mailboxes if the names would still point to an Exchange 2010 CAS. Another important check is whether new mailbox servers have been provisioned with enough disk space to accommodate the moved users, and if the properties of the mailbox database, such as ProhibitSendReceiveQuota and OfflineAddressBook have been set to desired values. Assuming that everything is fine, we go ahead and create some move requests, very much the same way as we did in Exchange 2010.
New-MoveRequest –Identity [email protected] –TargetDatabase mbd01
This command moves the mailbox of user3 to the target mailbox database mdb01 which is hosted on Exchange 2013. Like in 2010, the move is performed online, so the user is able to work in his mailbox until the move request is finished. Once the move request completes, the user will be prompted to restart Outlook, this is when the Profile gets updated to show the GUID instead of the server name or RPCClientAccessServer property.
Note that this is the users mailbox GUID, as that is the user’s unique identifier within the Exchange Organization, it will be different for every user. This GUID is used to locate the active mailbox database copy, in Exchange 2013 all protocols are provided to the user by the server that is hosting the active mailbox database copy.
Batch moves
In Exchange 2010 we had the ability to do batch move requests, but it was more like creating many move requests and assigning the same BatchName to them, Get-MoveRequest was used to retrieve information about the move requests. Now Exchange 2013 comes with some new cmdlets that are dealing with batch migrations: *-MigrationBach.
Honestly I do think those new cmdlets are a little complicated, I guess they were primarily introduced to make hybrid or cloud move requests easier, in an on-premises world they might not be that useful. I created a New-MigrationBatch and then started the migration. The first thing we need is a CSV file with a column called EmailAddress, so let’s get all users homed on the Exchange 2010 server, and export them to CSV:
Get-Mailbox -Server ex14 | select @{n="EmailAddress";e={$_.PrimarySmtpAddress}} | Export-Csv -NoTypeInformation -Path .\BatchMove.csv
Now we can use this CSV file to create a new MigrationBatch, you see what I mean with a little complicated…
New-MigrationBatch -Local -Name BatchMove -CSVData ([System.IO.File]::ReadAllBytes(".\BatchMove.csv")) -TargetDatabases mdb01
It’s looking like that in PowerShell:
Ok, once we have created the MigrationBatch, we can go ahead and start the migration to actually move data over to the new Exchange.
Get-MigrationBatch | Start-MigrationBatch
The Get-MigrationStatistics cmdlet can be used to get information about the ongoing migrations, once all mailboxes are moved, TotalCount and SyncedCount should show the same value. Get-MigrationUser can be used to get information about the individual mailboxes being moved. The Get-MigrationBatch cmdlet includes a Report property containing links to CSV reports about the MigrationBatch.
Note that the Start-MigrationBatch does not complete the move requests, use the Get-MoveRequest cmdlet to show the individual move requests and their state, it will be AutoSuspended. The Complete-MigrationBatch cmdlet is used to complete the move requests:
Get-MigrationBatch | Complete-MigrationBatch
If we run the Get-MoveRequest cmdlet again, we will finally see that mailboxes have been moved to Exchange 2013.
Since there is not much documentation available, yet, I will stick with the “old” way and just use New-MoveRequest to move mailboxes for now.
Outlook Profile
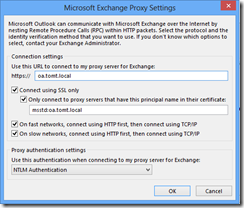
Ok so now that we have migrated our users over to the new Exchange it’s time to have a look at Outlook, as mentioned above, the profiles will be updated and no longer show a server name, but it will also be using RPC over HTTP on the internal network:
The proxy settings of the Outlook profile is updated, too, it will now select “On fast networks, connect using HTTP first…” by default.
The AutoDiscover.xml file now contains more information for clients, while Exchange 2010 had the following three Type nodes <EXCH>,<EXPR> and <WEB> the new AutoDiscover.xml contains two <EXHTTP> nodes for internal and external OutlookAnywhere settings.
It is very important to update Outlook to the minimum required version by Exchange 2013 before moving mailboxes, as older Outlook versions will not be able to interpret the new xml file.
Well, and that’s it for part four. We do have one big thing left for part five, public folders.
Stay tuned,
tom


